About Me

My photo
I am a wife to an awesome husband and a mom to 2 cute kids, 3 & 1. I love finding creative things to try, both with my 3 year old and on my own. It's hard to find time to be crafty between wife and mother duties, but when I find the time... it's a craftiful life! I hope some of the projects I write about will inspire you to have a craftiful life too!

Monday, October 31, 2011

Disney Princess Masquerade Masks

Lately, I've been trying to be more diligent in having craft time with my little girl.  So, I was trying to find some fun crafts to do with her, when I came across Disney family.com

This is my new favorite website! 

I love the ideas and different craft projects for kids.  Most of the crafts are for an older audience, but I did find these princess masks on the website and thought it would be easy enough for my toddler to decorate. 

She loved it!  Loved the sparkly glue mostly...


I think they turned out really cute!


This picture makes me laugh, but don't we all look like such pretty princesses?? 


Love n Nature

After searching for a while, I finally found some cute bedding for my little girl's room!!  I found it at Target and on sale no less!  The colors are great and the owls are just so cute!  The only downside is we only bought one curtain panel to match the set and now those curtains are nowhere to be found in stores... I'm still trying to come up with a plan to find another one.

Here's a little peek at her room:


There was a wall hanging that matched perfectly in stores, but alas I didn't buy it.  I started to regret that decision until I saw a cricut cartridge called Hoot 'n' Holler, which is filled with owls that looked alot like the owls on the bedding.  So I got to work and made my own wall hanging... again. :)  Seems I'm doing alot of this...  Anyway, the finished product looks great and matches perfectly!  


Wednesday, September 28, 2011

The DIY projects begin...

For those who don't know, we have once again packed up the moving truck and moved even further north!  In doing so, I have lost my beautiful home, or should I say scrapbook area...  So lately most of my crafting energy has been channeled into the house, however, I have managed to squeeze in some time to create a few scrapbook pages of our recent trip to Disneyland!

Our new home definitely has potential, it's just tackling this 1970's home can be a bit daunting.  I was really shocked to see the kitchen (yes we moved into this place without seeing it)... small and very outdated, but so far we've changed the hardware on the kitchen cupboards, reapplied the caulking around the tiles, and changed the electrical outlets from ivory to white and surprisingly  it has made a difference in how I feel about it. 

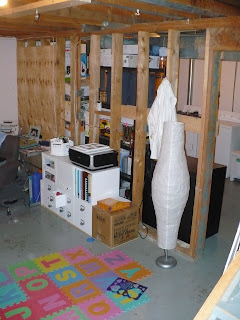
Our big project has been the basement.  An unfinished, cold, mess is hopefully going to turn into something a little more bareable and even useable!  The outside of the basement was all drywalled, thankfully!  So we (and if my husband was reading this he would say HE) put up the drywall down the middle wall.  So far mudding isn't going fast enough...  I can hardly wait to paint!

Before


After (with drywall)


If you would like to help me out... I need some paint ideas.  There are two windows in this room so there is some light down there, but it would still be nice to paint it something to brighten it up.  Any ideas??

Thanks for stopping by!

Tuesday, July 26, 2011

Remembering Our Vows

We are coming up on our 4th wedding anniversary and I still had yet to put up wedding photos. 
So, I decided my project for the day would be to get creative and get those wedding photos up!  I found this neat project in a book I bought and thought I'd try it out.

I'm not quite sure if they will stay this way, or if after looking at it everyday will cause me to do a revision.  But for now, I'm satisfied. 


I took two canvases and covered them with fabric I liked.


Took three cheap, light silver photo frames and stuck them on with tape. (might need a little glue depending on how heavy the frame is)


Added some ribbon and paper flowers with brads.


Typed out our vows and a song that was sung on our wedding.

Now we have no excuse remembering what we promised each other that day...

Tuesday, July 5, 2011

Redesigned Clock

I usually love a good before/after blog, but unfortunately I can't find a before picture of my newly redesigned clock. So, instead of showing the before picture, I'll tell you the story of how it all happened... 

One afternoon I was sitting in my craft room having a bit of scrappers block (you know... writters block, only for scrapbookers), when I started to look to my black and white clock for inspiration.

After what seemed like hours of staring and listening to the tick tick tick of the clock, inspiration came!!! But it wasn't for my scrapbook page, instead it was for the clock.  I imediately took the clock off the wall to see if it would come apart nicely... and to my exitement it did!

I cut a circle out of white paper for the background, added some paper flowers and buttons, and cut the numbers using my Alphalicious cricut cartridge. 

Now it's back on the wall; and I am now staring at a pretty clock still waiting for inspiration...


Sunday, June 19, 2011

My Babies

My Babies.. trying to remember what it was like when they were first born is hard sometimes. 
Time flies by... and things get forgotten. 
Hopefully these pictures will help me to remember to enjoy every minute I have with them.


Of course it's Jungle themed!

Friday, June 10, 2011

Mission Nursery

Mission: Find art for the Nursery
Theme: Jungle


This mission proved to be quite difficult.  I needed something that went with my jungle theme, but was inexpensive.  I thought my mission would be a fail until... I found these little gems...  pre-painted, wood cut-out's of jungle animals!!  How perfect are they?!


I bought some cheap white frames (took out the glass) and found some paper that matched the room for the background.  Glued the animals onto the background paper and my project was completed.

Quick, easy, inexpensive, jungle themed...
Mission Accomplished.

Thursday, June 9, 2011

A book for my little girl

My toddler loves coming into my scrapbook room... it's the forbidden room.  So on the rare occassion that she's allowed in, she's always wanting to look at pictures and flip through scrapbooks.  I felt bad always telling her to leave things alone, so I created a "scrapbook" of her own. 

I found pictures of everyone in our family and a few of her friends and a 4x6 album I had lying around, put the pictures on some patterend paper, glued on the names and gave it to her. 

It was a big hit! She loves looking through the book and tells me who everyone is... it's not perfect, and certainly not elaborate, but she loves it and that's all the matters!

Here's just a few pages from the book:


A clean craft room & an organized recipe book... what more could you want?!

Annnnnndd I'm back from my hiatus.  4 months is way too long.  I will try hard to write sooner next time.  Thankfully baby #2 is amazing and I have had lots of time to still be crafty.  (Nap time is a wonderful thing!)

Here's a few things I've finished over the last few months:

1. Craft room - it was a disaster zone! It got to the point where I couldn't even work in the room and started taking over other parts of the house... to my husbands dismay. So I took the plunge and did some major cleaning and throwing away!

ok, so my before picture doesn't even measure up to how bad it really got, but you get the picture...

Before:

After:

I was in need of storage and found these white cubes at Michaels, a little pricey, but you can find them on sale every now and then!

Now I can at least sit at my desk!
(once I find a chair!)

2. Recipe book - it was in need of desperate organizing. There were recipes falling out everywhere! Some were handwritten, some were typed, and some were torn out of magazines.  It needed to be organized, but my dilema was how I wanted to orgainze them. Did I want to put them in a book where I could see them all.. but then couldn't take them out? Or did I want to put them in a recipe box where I could pull them out... but couldn't see them all?

So I came up with a solution to both my problems, a book that I could put recipes in, but also take them out! (I know! so clever!)

Here's my finished product:


Took an old photo album


Typed & printed out all my recipes on 3.5" x 5.5" cards
(this actually takes a lot longer than you'd think!)


Cut pieces of patterened paper to fit inside photo sleeves


Cut out tabs to divide recipes into categories 


 And that's my finished recipe book!
Now I'm excited to do some cooking!

Monday, February 7, 2011

The Countdown is On!

The home stretch is finally here!!  And by that I mean, baby #2 will be here in just a few weeks!  The last couple days/weeks I've been "nesting", apparently this is what pregnant women do just before baby comes.  So, my days have been busy with cleaning and organizing, because I know I will have absolutely no extra time on my hands once baby comes.  But I have managed to complete a few crafty things amongst the cleaning.

One of the projects I decided needed doing was filling the frame in our living room with something other than christmas, it is February after all and the christmas decoration must come down.  I decided to try something different.  I got my cricut out and some vinyl and created some wall art, but because we're renting I didn't want to stick the vinyl onto the wall, so I used the glass and frame and stuck it onto the glass.  I think it turned out really great!  What do you think?


I've also been frequenting our new Dollarama store.  And you wouldn't believe how many cheap craft supplies you can get there!  I was looking for something to finish my kitchen and I found these pots for $2 and some greens for $1 each.  Stuck the greens into the pots and there you go... quick and easy plants that don't need watering!  I think it looks fresh and really brightens up the kitchen and an added bonus... the plants will always stay green.  :)


Hope you enjoyed a few more peeks at some of the things I've been working on. 

Wednesday, January 5, 2011

A Changeable Wall Hanging

I'm back to blogland.  It's been a while, but I'm finally home from the holidays and have finally found some time to sit down and write this long awaited post.  Early in November I started a small project that ended up getting bigger and bigger!  Well, it's finally ended and I can now show you all!  (I know the anticipation is killing you!)

The idea came when I was browsing through some blogs and found this neat decor idea.  I thought it would be a great gift for Christmas and soon decided it would be perfect for my mom and mom-in-law.  The idea came from Dittle Dattle's Family Wall Hanging 

I started off with just the word family, but I started thinking and came up with an even better idea...  "What if I made a few words that could be changed through-out the year?!"  SO that is how my little project expanded into a bigger one. In the end I made two sets of three words and here they are:


I am so glad I finally got to share this with you!  Hope everyone had a great Christmas and I wish all the best to you in the New Year!